
First, we will learn what Wireless-N WiFi repeater is: It is a device which helps in enhancing the internet network in poor area of your house. Poor area is basically a location, where internet strength is weak and range is less. Wireless-N WiFi Repeater is easy to setup. So, let’s discuss how we can install the Wireless-N WiFi repeater setup.
1.First of all
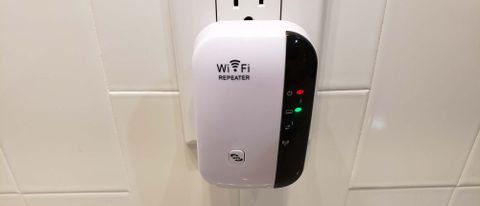
plugin the Wireless-N WiFi Repeater into a wall socket near your main router.
2.Now, you
have to connect your main router to repeater’s network. To connect there are
two ways:
Wireless Connection:
ØGo to the list of available WiFi networks on your computer or smart
phone.
ØAnd connect with the repeater’s network
Wired Connection:
ØYou have to use an Ethernet cable to connect the repeater directly
with your router.
ØTo connect, you have to insert one side of an Ethernet cable to the
repeater and other side to the router.
3.After
connecting router and repeater, you have to now launch a web browser. Type
myrepeater.net or 192.168.10.1 into the address bar.
4.You will be
now prompted to WiFi repeater login page. Enter a username and password. Check the user manual for
credentials.
5.Once you are
logged in, you will see a ‘Repeater Mode’ option. Select this mode and allow
the repeater to connect to your main WiFi network.
6.You have to
click on the option to scan for available WiFi networks. The repeater will
display a list of nearby networks. Select your main router network from the
list. Enter the password for your existing WiFi network to allow the repeater
to connect.
7.Now you have
to set up the extended network. You can usually set the name of the extended
network as per your convenience. You may either, use the same SSID as your
original network or create a different name so you can easily distinguish
between the main router and the repeater.
8.After
configuring the settings, save them. And your setup is done.
9.Once setup
is complete, unplug the repeater and relocate it to the desired position.
Repeater should be placed such way that lies between your router and the area
where network is poor.
10.Make sure
the repeater is still within range of the router’s signal for optimal
performance. A good indicator of positioning is when the repeater’s signal LED
is showing a strong connection.
Here is the Wireless-N WiFi repeater setup. If you are having any trouble while setting up the repeater, you can follow these troubleshooting tips mentioned below:
Troubleshooting Tips
Placement of Repeater:
Repeater should be kept halfway from the main router and the area where network is poor. Make sure the distance between router and repeater is not too far. As it can affect the network and you can’t have the best optimisation coverage.
Restart:
Sometimes a minor issue occurs and it resolves easily by restarting your device. To restart, plug out the switch from repeater and wait for few minutes and then plug it back in. This will resolve your issue, but in case your issue is still not resolved. Then try restarting your router same way as the repeater.
Reset:
Usually the last option is to Reset your repeater. To reset, locate the reset button on a repeater. Then press the reset button and old it for like 10 seconds. You repeater will be reset. Now, you have to configure the repeater again by performing 192.168.10.1 WiFi repeater setup.
Conclusion
From the above topic, we have discussed that Wireless-N WiFi is easy to setup and we have even shared some troubleshooting tips above. So, you won’t stuck in between the setup.


